

Showing posts with label home renovation. Show all posts
Showing posts with label home renovation. Show all posts
Thursday
Craft Room Makeover
My craft room has been in need of a makeover since before we bought this 1956 fixer upper. During the 1970’s the original homeowners put paneling in this room plus several others. I’ve turned this dark and dated décor into a light airy space with an inexpensive paint make over without removing the paneling. This DIY home improvement is an easy and rewarding project a beginner or novice can accomplish in a long weekend under $100.

Monday
DIY Dry river bed and painting rock fish
Despite the heat and my lack luster energy, I slowly finished a dry river bed across the front of the house. Besides enhancing my garden view, its main purpose is to stop the eroding gulley effect around the drip line of our roof. There are plants, rocks and a few garden animals along the “banks” and the grands painted some colorful rock fish to wait for the water to flow. I’ll tell you how I created the river bed, how we painted the fish below.


Tuesday
DIY Painting floors with stenciled rug design
We moved into a fixer upper a year and a half ago. From the very moment I walked through the house we purchased I
hated the glued down indoor outdoor carpet in the kitchen. The very first thing I saw and the first thing every one who has been here comments on is some pretty dated plaid glued down carpet in the kitchen and laundry areas. Changing it had to be placed down farther than I liked on the "to do list" but I came up with an interum alternative that both hubs and I are happy with. An easy floor paint job.


Friday
Caulk a straight line
Have you ever procrastinated a job on your to do list because it just seems like it's going to be a mess? Yes, me too. I finished putting down the vinyl floor months ago but had not caulked around the edges. Around the entire small bathroom renovation. The good news is that someone told me an easy method to get a straight caulk line.


Monday
Where are the connection points to a dishwasher?
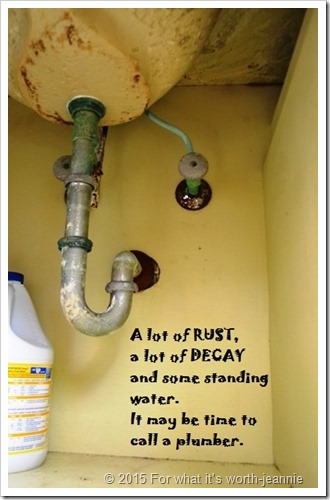
Plumbing is becoming my worst nightmare. The plumber we were using either retired or has too much to do to call me back. Actually he never calls back, just shows up at my door a day or so after I leave a message and fixed the latest problem. This time he didn't call or come by so I found a handyman that is a whiz at plumbing to replace the crumbling pipes under the bathroom sink and to install a new kitchen faucet. I was thrilled to get all that done for a very reasonable price. Then the ancient dishwasher stopped working. That lead to pulling it out and discovering a disaster in plumbing and electrical issues hidden behind it.


Friday
When to make a plumbing commitment
So, I found someone to install new faucets in the kitchen and bath. He noted that the plumbing under the bath sink is pretty deteriorated and to be prepared for a possible escalating of repair needed [and costs]. He said it was kind of like teens in love. Once things get started it's easy to get carried away. Consider if you want to commit to it. Hm. Then this morning it was clear we need to commit.


Tuesday
A DIY small bathroom renovation and reveal
Amazon affiliate links may be included.
I have finished both the guest bathroom and our master bathroom. They are updated and slightly renovated. I did most of it myself - DIY hubs changed out the toilets for me. Those suckers are heavy! Actually, we put new water saving toilets in the master and #3 bath. The #2 guest bath toilet is still is good shape and matches the décor. Here is a tour of the guest bath. 
Sunday
DIY Refinishing Wood Floors
We quickly decided to refinish the original oak floors ourselves when we discovered them under the old carpet in the 1956 Home Renovation project. It has taken a couple of weeks to complete but only because there were walls, baseboards, five window frames, two doors and four panel shutter doors on the closet to be painted and a new ceiling fan to be installed. The room is finally complete and the furniture is in place. I’d say that even though we took our time (and several breaks) the job of refinishing wood floors was much easier than I expected.


Monday
DIY Home Renovation–The Roof
A good roof is about as important as a good foundation and now that we have the foundation stabilized new composition shingles are being installed on our 1956 Fixer Upper. After careful consideration we chose a roofer that is known in our area as reliable with a good product. The estimate was not the highest or lowest. We made our decision based on the 35 year product, recommendations from local customers, and the fact they would install a tube sky light at no additional fee. Hubs thought he wanted an earth tone brown for the roof but after we saw the samples outside on the roof we settled on a dark grayish color similar to the old roof color. The contrast with our red brick and white trim looks very nice.


Tuesday
DIY Home Renovation–The Foundation
The 1956 Fixer Upper is now standing firm on its foundation. Fixing a foundation is something best left to professionals. It was a stressful decision choosing a company to stabilize the foundation. After five bids that varied a great deal we chose a company out of Amarillo, Texas. They arrived when they said they would and worked tirelessly to finish ahead of schedule. The process was interesting, even a couple of friends drove out to see as many home owners in the area are checking out recommended foundation repair companies. The Texas drought has not been kind to foundations.


DIY Home Renovation–Painting the Front Door
The 1956 Fixer Upper front door was white and it will eventually be replaced with a windowed door but for now, there’s paint. There is nothing wrong with a white door, I am just ready to get bold with some color. Besides, it’s just paint and it can always be repainted, right? While shopping I picked up several color cards in the paint section and took them home. I narrowed them down to a color that goes well with the red brick and I am quite fond of and showed it to hubs. He has color aversion when it comes to walls and doors so I was surprised when he nodded his head in approval. I pounced on it and purchased a quart of exterior satin acrylic before he could change his mind.


Monday
DIY Home Renovation–The fireplaces
There are two fireplaces in the 1956 Fixer Upper House that we are anxious to use, but not before they are checked out. We do not know if the previous owners had the chimneys cleaned or inspected so for safety sake we are using a professional chimney sweep. I will admit I priced the wire brushes and rods and contemplated very briefly having hubs get on the roof. However, the cost of the equipment was about 1/3 the cost of having it done professionally and hubs wasn’t too keen on climbing the roof.


DIY Home Renovation - the air conditioner
The small town we moved to has only one plumber who is multi talented. After he re lit the gas water heater pilot light several times and worked for days on unclogging the aged pipes in the 1956 Fixer Upper that make weird noises he worked on the A.C. unit. After two weeks of having electricians reconnect this old house to the modern world the A.C. still wouldn't turn on. The plumber/A.C. man ordered a computer board on the fan that appeared to be burned out but it still wouldn't turn on the unit outside.
 |
| No, not this fan! The one in the central air box. |
Tuesday
Texas views from the 1956 renovation house
We have moved into the 1956 fixer upper and though we are struggling with utility issues, we love being able to sit outside under the oak tree and take in the expansive view of skies during the day and the unbelievable star display at night. In our suburban house we could only see straight up and the city lights made stars appear faded and few. Out here when the sun goes down and the moon has not made it’s way into the sky, it is DARK and the stars are BRIGHT. The horizon is mesmerizing.


Monday
DIY Home Renovation–Painting wallpaper
This weekend we had a house full of company and all wanted to do something to help move the 1956 fixer upper project along. I had primer and paint already purchased for the entry. The big question was, “Can I paint my wallpaper?” We girls did a test and went for it while the boys carried out the very large, very heavy, very dark old rug from the den. Immediately the room felt better. The dusty smell began disappearing as the little grands used the dust mops and Swiffer wet mop to remove even more dust.
The front entry had a flocked brownish gold wallpaper that definitely needed a make over. I wasn’t sure how it would look but the test patch looked okay and I am pleased with the outcome. First it got a good dusting with both a broom and some rags then the floor was covered and the door frames and baseboards taped off. I bought primer/paint in an antique white that closely matches all the woodwork. The woodwork paint is in great shape and won’t need repainting until much – much later on. We used paint rollers to get paint into the flocking. We also tried dabbing the flocked paper with a sponge and stippling with a paint brush. The stippling worked best but the paint roller was faster. We applied thin coats allowing time to dry between. Some bubbles appeared in the wallpaper from the paint saturation, but as it dried they stretched back out and disappeared.

The front entry had a flocked brownish gold wallpaper that definitely needed a make over. I wasn’t sure how it would look but the test patch looked okay and I am pleased with the outcome. First it got a good dusting with both a broom and some rags then the floor was covered and the door frames and baseboards taped off. I bought primer/paint in an antique white that closely matches all the woodwork. The woodwork paint is in great shape and won’t need repainting until much – much later on. We used paint rollers to get paint into the flocking. We also tried dabbing the flocked paper with a sponge and stippling with a paint brush. The stippling worked best but the paint roller was faster. We applied thin coats allowing time to dry between. Some bubbles appeared in the wallpaper from the paint saturation, but as it dried they stretched back out and disappeared.

Thursday
DIY Home Renovation–the plumbing
When you purchase an old home that has been sitting vacant for many years you expect lots of problems. We tackled the biggest electric problems in the 1956 Fixer Upper first and moved to the plumbing. The city inspectors insured us the water is fine on their side of the water meter. Isn’t that always the story? They did help out by digging up their meter to be absolutely sure and what they found is that the pipe exiting the meter on our side appeared to be corroded and barely any space inside the pipe for water to flow. They also noted a 90 degree turn in the pipe probably wasn’t helping. That would explain the tiny trickle of water coming out of the faucets. Fortunately for us our son worked several years for a city water supply and has a great deal of knowledge about laying new pipe. I contacted the 411 Dig people to mark the various underground wires and pipes so we wouldn’t add to our problems by an accidental cutting of gas pipes or cable wires.


Wednesday
DIY Home Renovation-the utilities
The 1956 fixer upper projects are coming together. There have been some surprises for sure. After several days of arguing with the power company and provider we finally convinced them to send someone to verify there is indeed no meter at this house. While my DIL was on the phone trying again to explain there was no meter and where ever they turned on power…it was not at this house, an AEP Supervisor that lives near us drove to our house and confirmed we do not have a meter or power. He located the meter the company assumed was ours on an apartment/garage building at one of our neighbors. They had given it our house number as an address. After a lot of discussion it was decided to give us back our address and re label the neighbors garage apartment. Our meter is now installed on a pole outside the backyard that will have to be moved to the house by an electrician.


Tuesday
DIY Home Renovation -1956 Fixer upper plan
The first time we looked at it was a cool spring afternoon. With no utilities in the house it was a bit dark. The owners were parents to high school acquaintances of hubs. The father had passed away 14 years ago and the mother had moved in with the oldest son. She passed away 5 years ago and the house was closed up until now.


Monday
DIY How to Repair Cracked Fireplace Brick
Spring cleaning is done and now we are making a couple of repairs to our current house. The fireplace stone that is in the bottom of the fireplace has a crack that requires a silicate high heat furnace cement to repair it. It took some calling around to find a supplier. Fortunately we are suburb dwellers and only had to drive about 15 miles to find it at Turner's Hardware. The container we purchased seals metal to metal or cement to metal, stops smoke or gas leaks and withstands temps up to 2000 degrees. THAT IS HOT!

Sunday
Staining the kitchen cabinets
I put the guest bathroom back together, decorated and closed the door. But I wasn't really happy with the cabinetry and hadn't really decided on the mirror replacement. My designer daughter in law came to pick up the little grands and encouraged me to go forward with refinishing the cabinetry. We made a trip to Home Depot, checked out the cabinets and found what I dreamed about a possible project. We bought the supplies and got down to stripping the old and staining with the new. All I can say is she definitely guided me the right direction. I like it so much that after she left I took out the little accent table and took down the wall shelf and they are now sitting on the patio work station with the first coat of stain. I finally feel room 2 of the One Year Project is done.
 |
| The patio work station. Yes, the "Off" is absolutely necessary! http://forwhatitsworth-jeannie.blogspot.com/p/one-year-project.html |
Subscribe to:
Posts (Atom)