

Showing posts with label Halloween. Show all posts
Showing posts with label Halloween. Show all posts
Monday
Pumpkin flavored Stuffed Jalapeño Appetizer
We experienced a delightful field trip to a Pumpkin Patch near Floydada, TX. It’s in a country setting among fields of pumpkins! Pumpkin inspiration washed over me as we visited a large barn filled with pumpkins, gourds, some crafty items and edible treats. The whole experience set me in a mood to get busy and create. My son came up with a delicious pumpkin flavored stuffed jalapeño appetizer I submitted to #SoFabSeasons pumpkin themed group post with his permission and I’m sharing it with you.


Thursday
Quick Easy Adorable Halloween Decorations
If you want to put together some quick, easy and cheap Halloween decorations for a party or just for the fun of it, you'll love these ideas. Most are from things you already have on hand and others can be purchased at a dollar store.


Wednesday
Easy Halloween party decorations plus a free printable
This shop has been compensated by Collective Bias and its advertiser. All opinions are mine alone. #TrickOrSweet #CollectiveBias

Tuesday
DIY Creepy Halloween Sign from recycled fencing
I enjoy making something from things that would normally make their way to the dump. It’s like free stuff. That’s why when hubs shortened our wood privacy fence last summer to give us a better view of the open fields and rising sun I latched on to a couple of the rickety pieces. They sat outside all year weathering even more than they already had to make a perfect project for Halloween decorating.

He cut the tops off leaving perfect little arrows still attached to the top rail of the fencing. The little grands and I have used several of these ready made arrows for individual projects. The little grands saw them as pointy hats and feet that just needed Snowmen and Santa bodies painted. I saw one particular piece as a Haunted Halloween Sign board.

The only supplies I needed to transform the recycled fence pickets attached to the 6 foot cross bar were:
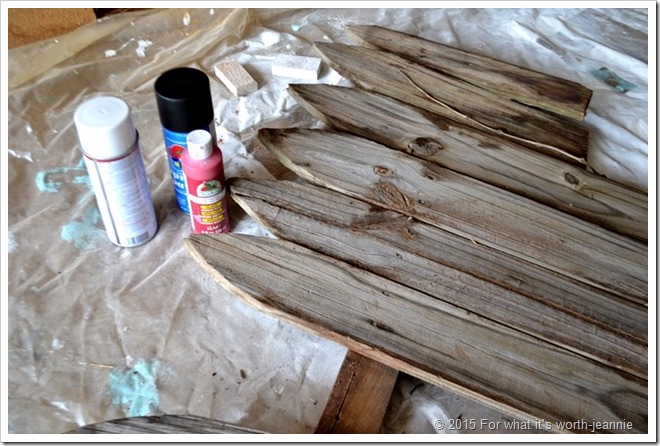
Next, I lay the sign post with the pieces left attached on a drop cloth. I use an old plastic shower curtain as a drop cloth. It’s a good size and heavy duty enough to stay put on the floor unlike those light weight ones you can purchase in hardware stores. But you use whatever you have handy to protect the area where you paint.

I took several cans of spray paint in different colors and sprayed some random blotches on the arrow shaped boards. I had white, green, and red but it doesn’t really matter what color you use as long as the words you will paint show up bold.
After the spray paint was dry I used a small paint brush to roughly scribble on some Halloween locations. I also squeezed some paint straight from the container for some frightful lettering. I wasn’t looking for neat or perfect. Rather I was after spooky and creepy.

I allowed all the paint to dry thoroughly before standing the sign post up next to our chain link fence post. Several long zip ties worked perfectly to hold the sign in place. You could also use duct tape. I think it turned out pretty cool, if not creepy for a free project.

He cut the tops off leaving perfect little arrows still attached to the top rail of the fencing. The little grands and I have used several of these ready made arrows for individual projects. The little grands saw them as pointy hats and feet that just needed Snowmen and Santa bodies painted. I saw one particular piece as a Haunted Halloween Sign board.

The only supplies I needed to transform the recycled fence pickets attached to the 6 foot cross bar were:
- hammer
- drop cloth
- spray paint
- craft paint
- paintbrush
- zip ties

Next, I lay the sign post with the pieces left attached on a drop cloth. I use an old plastic shower curtain as a drop cloth. It’s a good size and heavy duty enough to stay put on the floor unlike those light weight ones you can purchase in hardware stores. But you use whatever you have handy to protect the area where you paint.

I took several cans of spray paint in different colors and sprayed some random blotches on the arrow shaped boards. I had white, green, and red but it doesn’t really matter what color you use as long as the words you will paint show up bold.
After the spray paint was dry I used a small paint brush to roughly scribble on some Halloween locations. I also squeezed some paint straight from the container for some frightful lettering. I wasn’t looking for neat or perfect. Rather I was after spooky and creepy.

I allowed all the paint to dry thoroughly before standing the sign post up next to our chain link fence post. Several long zip ties worked perfectly to hold the sign in place. You could also use duct tape. I think it turned out pretty cool, if not creepy for a free project.
What Halloween locations would you add?
Monday
DIY No Carve Pumpkins for Halloween
It’s almost Halloween so Little Grand is ready for a fun kid activity and to transform our Fall Pumpkin Display into fun and playful Halloween decorations. I wanted to avoid carving the pumpkins so that after Halloween they can still be used for Thanksgiving décor.


Sunday
DIY an overgrown cedar tree into a life size Bonsai Tree
There was an overgrown evergreen tree next to our entry gate that we thought was in need of removing until we discovered the beautiful trunk beneath all the overgrowth. This is how it looks (on a very windy day!) and you can see some progression shots of the hidden beauty.


I love how it turned out and how the sunset shows off its shape and form.
Wednesday
15 No-carve Decorated Halloween Pumpkins
Today I had the privilege of having lunch with little grand at her school and viewing the 100+ pumpkins students put on display for a decorating contest. It amazes me how many creative ideas they came up with. Of course I saw a lot of "off Pinterest" designs too. I took a hand full of photos of some of the ones that grabbed my attention the most to share with you on my blog today. Enjoy.


Tuesday
Cinnamon Orange Sugar Cookies

Great Grand helped me make cookies this week. He especially enjoys cut outs, so we made mummy cookies to take to a family party this weekend. That is, if we have any left! I use my standard tried and true sugar cookie recipe with a twist.
Monday
DIY Halloween lights kids can make.

I found out just hours before time that great grand was coming over for two days of daytime babysitting. I had to quickly come up with some entertaining crafts for a 3 1/2 year old to keep him entertained. We did our usual cookie baking, hide and seek games, object counting, color identification, book reading, playground time, McDonald’s lunch and this fun DIY Halloween light decoration.
Friday
Signs that a party is brewing
It's getting close...the party is next weekend. Today's project was not hard at all. I love easy projects that go just like I imagined! This party is for our large extended family and a few close friends. We needed a sign board that gives the party guests an idea of what is available and when they should move on to the next activity. I scavenged through hubs wood stash in the garage and found an appropriate board. It is a piece of particle board about 2 feet by 4 feet. A trip to Walmart, a can of Rust-Oleum Textured Black spray paint, and 10 minutes later (plus some drying time) I have a chalk board. I didn't even bother sanding it because I think the slight roughness of the board helps release the chalk. I borrowed some colored chalk from the grands art box and... we have a sign. There will probably be some adjustments, but I like the look a lot.

Thursday
DIY Sock Alien
It's getting spooky around here. There seems to be a dark alien lurking in the rose bushes!

Here's how that alien came together.
Wednesday
Pumpkin patch invasion!

Beware!
Miniature pumpkins in the flower pot by our back door have matured
into little people and some have even moved into the house.
They have taken up residence
 on the mantel


It is believed [mysterious music]
that it is possible-
that leaving little pumpkins in the store bag over night
that leaving little pumpkins in the store bag over night
with grapevine craft wire and a black sharpie
may have caused the mutation.
may have caused the mutation.

All I know is, they were fine when they were placed in the flower pot.
Then, the dog alerted us that something had changed outside.
And before long, there they were...on the mantel too!
They do seem to be friendly though.
No other mischief has been discovered.
We are keeping watch though...after all Halloween is coming.

 |
| The little pumpkins were purchased at Walmart. A box of 10 was $2.97. Use a fine tip Sharpie pen to draw faces. Cut 2 lengths of grapevine craft wire about 6-8". Twist together for a body. Twist a short 2-3" florist wire where a neck should be. Push a mini pumpkin onto the florist "neck" wire. Pose the body however you want to. |
I'm really grateful you stopped by.
Hope you discover something wonderful today,

Tuesday
Whoo hooo likes eggs?

Why have a plain boiled egg or a plain deviled egg when there is an alternative? I've been practicing healthy food choices for a Halloween party, so when hubs mentioned deviled eggs, the easiest (and cheapest) finger food ever, I gave them a make over.
Friday
Jeweled jack o lantern
Remember those orphaned sock pumpkins? It's October so they are getting ready for trick or treat with some garage sale ear rings. Talk about a quick dress up! All I had to do was remove the backings and push the posts into the pumpkin.

 linking at:
Wickedly Creative Halloween Ideas
Handmade Halloween Party
Under the table and dreaming Sunday Showcase
Fabulous Friday @ Here Comes the Sun
One Artsy Mama Shine on Friday
Pintastic Monday Halloween Edition
Made in a day Halloween Spooktacular

For directions on how to make a pumpkin from an orphaned sock, click here.
I'd love to have you as a follower. If you'd like a "follow back" leave a comment.
Thanks for stopping by, hope you have a great week!

Wickedly Creative Halloween Ideas
Handmade Halloween Party
Under the table and dreaming Sunday Showcase
Fabulous Friday @ Here Comes the Sun
One Artsy Mama Shine on Friday
Pintastic Monday Halloween Edition
Made in a day Halloween Spooktacular
Wednesday
Yard witches
It's time to start putting out the Halloween decorations...yeah! Little Grand just loved the yard witch I had out last year, so I made one for her yard. Fortunately for me, a neighbor replaced their fence a couple of weeks ago where I salvaged a few boards. I also went through the garage finding paint and a cross piece for the hat, making this DIY project almost free.
 |
Tuesday
Pumpkin sleeve

I was tending to my seasonal chore of changing out my wardrobe and at the same time purging things I don't like or never intend to wear again when I came across this sweater that didn't really fit well but that I liked the fabric pattern. I saw immediately it's potential in saving yet another ugly plastic pumpkin!
As quickly as I finished the wardrobe changing I had the sweater on the floor measuring the sleeve to fit an ugly plastic pumpkin pulled from the attic.

sweater meets pumpkin

I liked the reverse print color best, so after measuring the pumpkin
and cutting a sleeve to fit it was flipped inside out.
A bit of quilt batting was slipped around for softness.

Pull the opening closed with needle and thread on both top and bottom.

Cut 4 lengths of jute rope twice the circumference of the pumpkin.
Use one of the lengths to tie them all together in the middle.

Place the tied jute on the bottom of the pumpkin and spread out the ends like this.

Gather the jute on top and give a few twists to hold it in place.
Flip the pumpkin over.

Twist the jute ends and fold back down over itself so that it meets the pumpkin top.
Securely tie an additional piece of jute rope at the neck of the pumpkin.
To make a stem, wrap more jute rope around the twisted jute starting
at the neck of the pumpkin going up to the top and back down again,
ending where you began. Tie it off securely.

Add a couple of silk or real leaves.
I have a huge collection of brooches, so this pretty butterfly brooch
gets a new home for the fall on the pumpkin.
I'm more in love with this pumpkin sleeve than I ever was as a sweater!
Thanks for stopping by,

Linked up @
Subscribe to:
Posts (Atom)