

Showing posts with label Christmas. Show all posts
Showing posts with label Christmas. Show all posts
Wednesday
Cranberry recipes decor crafts collection
Cranberries are a seasonal fruit that are beautiful, deep red, full of antioxidants. If you live in United States you've seen the very funny commercials telling us so. I love pulling out those colors to decorate in the winter and they taste pretty darn good too. I am excited to share with you this collection of amazing Cranberry themed posts from many of our outstanding members here in the Social Fabric community. We know that you will enjoy them and hope that you can create some new fall memories for yourself and the ones you love.

DIY Bow Tree Topper
Whether you need a big fluffy bow for a package or to top your holiday tree I've got a tutorial that will walk you through it in super easy steps. They are really easy and if you use wired ribbon at a dollar store you can save money making your own bow. Five steps and you'll wow yourself with your new talent.

Friday
Gift bucket for a man that includes Yankee Candle Car Care fragrances
This shop has been compensated by Collective Bias, Inc. and its advertiser. All opinions are mine alone.#LoveAmericanHome #CollectiveBias

Black Friday is a weird shopping phenomena in the USA that makes grown men and women stand in freezing weather for hours and push their way through crowds in a not so friendly holiday spirit. As I get older the frenzied shopping gets less and less exciting. This year starts a new tradition of gift giving from hubs and me. I am putting together gift baskets of useful items that will be as much fun to open as a Santa Stocking. Each basket is tailored to be the perfect gift for a person special to us.

Tuesday
Christmas Home Tour
I love driving through neighborhoods all lit up and I love holiday home tours, don't you? This year we moved to a 1956 home we are actively renovating and I could barely contain myself to wait until after Thanksgiving to put out the Christmas decorations. I'd love for you to stop by for an open house tour and then head over to my blog world friends for more seasonal fun.

Ring the bell and come on in. I'd love to give your a tour.
DIY Craft: Painting glass
Welcome to my first Craft Sunday at the 1956 Fixer Upper. DIL asked if she could invite a couple of friends to our Craft Sunday and I happily complied. This month we are going to try painting on glass so I picked up several pieces of clear glassware at a thrift store and spent an afternoon practicing so I could give at least a little guidance toward success. My project is a pumpkin on a stemmed wineglass using flat acrylic craft paint. The second project is also a pumpkin but using gloss enamel paint. Pumpkins are all different, so don’t strive to make them so matchey matchey. Both paint methods were successful, but the enamel will be a more durable finish after it is baked and a bit more washable if I use it as a wine glass. Read on for my success tips.

Monday
Bake, Decorate, and Create for the Holiday
Christmas crafts, Christmas foods, Christmas decorations, Christmas traditions are near and dear to most of our hearts. It started when I was a kid hearing the season music, the smell of a fresh tree in the house and anticipating the Santa watch on Christmas Eve. My Dad was very excited about the holiday and went to great lengths to make it special for all of us. My grandmother made hot cocoa as we little kids waited anxiously and the uncles took turns guarding the door to the Christmas room increasing the excitement until everyone was present and ready. In that spirit here’s a look back at some of my favorite December posts. Each photo is linked to the original post with recipes/tour/DIY’s. I hope you enjoy it and hop around to some of the other blogger participants in our Look at Christmas Past. Clicking on each photo will take you to the post.

Tuesday
Orange Sugar Cookie Snowflakes

By now, if you’ve seen my blog very much, you recognize I really love sugar cookies. I prefer them soft and chewy, and I like to vary the flavor by changing the extracts. I always use the same basic recipe you can find here. We are heading over to a neighborhood gathering this afternoon so I made these snowflake shaped sugar cookies using an orange extract instead of vanilla. The icing is a simple powdered sugar one with a tiny bit of merengue powder to make it stay in place. My biggest tip in making sugar cookies is not to over cook them. They aren’t suppose to be brown, just done. Stick to the recommended cooking time and if you aren’t sure they are done, just use a spatula to lift one off the cookie sheet and see if the bottom is slightly brown. Ice after they are completely cool and for that extra sparkle you see on the snowflakes, sprinkle some crystal sugar you can buy in the cake decorating section of your store. They aren’t almost home made, but they are so easy you will be making them all the time.
Thursday
A little red on the bed for the holidays

It didn't take much to add a little holiday to my white bedroom. The wreath came from my sister, the quilt was purchased years ago and the pillow is a long scarf with a rolled bed pillow inside. Big girl grand thinks it looks like a roll of candy. I secured the bed pillow in a roll using masking tape! Knots on the end of the scarf is all that holds it together.
Tuesday
Money Tree Origami

DIY Refrigerator Snowman

Let it snow, let it snow, let it snow! The fridge was cleaned for the holiday (you can use my how to and cleaning solution here) and ready to be decorated. Snowmen are a fun decoration for the holiday because they are good through January. And they are easy to craft with kids and grownups too! This morning I put up a really quick snowman on the fridge. He has a hat made from 2 bright greet lunch bags, eyes from a dollar store magnetic Halloween ghost kit, construction paper nose, magnet strips mouth and a twisted sheet of dark green tissue paper for his scarf...oh and some magnetic dots for buttons. All things I had on hand.
Go ahead and put one up, or better yet, let the kids create him from stuff you have. Now, show me what you made!
Monday
The night before Christmas Eve
we're busy as elves. Hanging stockings by the fireplace, nibbling cookies and playing games with the family. It's when I'm most aware of how lucky I am to be from a big family that loves each other unconditionally. Mom sits in her chair soaking up the sight of her children, grand children, great grandchildren and one great great grand child. It's noisy and chaotic as we laugh and kid each other. As the night winds down we coax the kids to bed, later than normal, and overfill the stockings for our traditional Christmas Eve morning party. This is what we have labled as our Christmas Eve-eve. It's my favorite day of the year.
 |
| faces are blurred to protect the "shy". |
Make traditions!

Snow fridge.

Friday
My Holiday House tour 2012.
Let it snow and enjoy nature.
 |
| The snowman vignette. Those snowballs...just styrofoam, no crafting required! |
 |
| Mantel |


 |
| Pecans waiting to be shelled on the hearth. |
 |

 |
| A vintage decorative box, recycled vanilla bottle, styrofoam "snow"ball on a vintage doily. |
 |
| Break time happens here :-) |
 |
| Fresh greenery and crepe myrtle branches from the yard in our ash bucket with a few more snow balls. |
At mom's house: You can see how we changed the old, way too big, fake tree into an adorable table top masterpiece here. the door DIY sock wreath I made for mom here and check out the cinnamon/applesauce garland here. If you're interested in seeing the fabulous west Texas sunsets or other things I found cool, check out my Instagram site here. You can find soup recipes that were adapted for the two of us that are heart healthy and diabetic friendly here and here.
Thursday
Cinnamon applesauce ornaments

One of my favorite holiday smells is cinnamon and apples. These are the simplest things to make and the smell is so rewarding!

Start with one of those individual serving cups that is 3/4-1 cup of applesauce and start adding cinnamon until you have a nice workable dough -about 4 oz. I made the first batch with what was left in a big container of apple sauce. Add slowly and stir gently, there will be a cloud of cinnamon rising up! It will be slightly sticky, so roll the dough out between wax paper to about 1/4" thick. They shrink very little, so what you see is pretty much what you get. If it seems a bit too sticky, sprinkle some cinnamon on the surface of the wax paper. Cut out the shapes you want and place them on a cookie sheet.


Use a straw to cut out a hole for hanging. Dry them out in the oven set at 225 F for about 20 minutes. They will not be completely dry, but you will be able to pick them up and turn them over. If you prefer, you can let them air dry instead if you have a couple of days to spare. When the area around the hole appears dry (you'll know by the color change) you can string them up on twine or ribbon and hang on the tree, or make a garland, or tie onto packages. Let your imagination run wild!
The wreaths in our windows are made from fresh Rosemary. You can see how to make them here.
Wednesday
My holiday kitchen
is a fun and easy project.

Put your cookie cutters in a clear container like the tall slender pitcher shown in my kitchen. Leave a few on the counter to give that feeling the cookie jar may need to be raided! The star cutters are my favorite and the ones I like to make cookies with most. Like the wreath? DIY Rosemary Wreath instructions here.


Put your cookie cutters in a clear container like the tall slender pitcher shown in my kitchen. Leave a few on the counter to give that feeling the cookie jar may need to be raided! The star cutters are my favorite and the ones I like to make cookies with most. Like the wreath? DIY Rosemary Wreath instructions here.

There are a trio of ginger man cookie cutters ready to march above the stove!
They have already been busy making cinnamon crisp crackers.
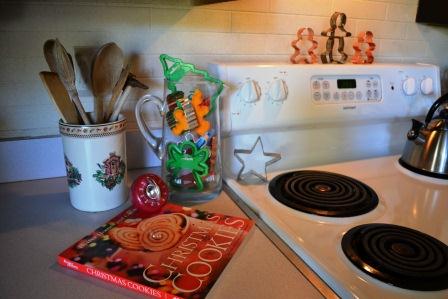
And who isn't tempted to pick up a Christmas cookie cook book like this one!

It's beginning to smell a lot like Christmas...
Tuesday
DIY Christmas Sock Wreath
 Our large family has gathered at our family home on the
night before Christmas Eve to play games and socialize all our lives. The night turns into a huge slumber party
when we put the children to bed and the adults fill stockings for our Christmas
Eve morning together. Every year of my
life my mother has hung up a Christmas sock for each member of our family to
fill. I don’t mean those felt creations;
I mean the kind you wear; a pair of socks with Christmas patterns on them. After all these years I have a drawer full of
them. There are too many to wear, even
every day of December! This year I
determined to make some kind of craft with them.
Our large family has gathered at our family home on the
night before Christmas Eve to play games and socialize all our lives. The night turns into a huge slumber party
when we put the children to bed and the adults fill stockings for our Christmas
Eve morning together. Every year of my
life my mother has hung up a Christmas sock for each member of our family to
fill. I don’t mean those felt creations;
I mean the kind you wear; a pair of socks with Christmas patterns on them. After all these years I have a drawer full of
them. There are too many to wear, even
every day of December! This year I
determined to make some kind of craft with them.
I spotted some pipe insulation and was quickly reminded of a
Pinterest creation where a pool noodle had been used to make a wreath
form. With that inspiration, I took a
wire clothes hanger and the pipe insulation and went to work.
 |
| Supplies: Socks, clothes hanger, pipe insulation, scissors, pliers |
 |
| Bend and reform a wire clothes hanger into a circle. |
 |
Unwind the hanger so the pipe insulation
can be easily slipped onto the form.
Cut the pipe insulation the length of the hanger,
leaving the hook exposed and slide it onto the wire.
|
 |
| Snip the toe out of the socks you intend to use so that they can be slipped over the insulation. Push the socks together to make a “bunchy” look. If the heel sticks out too much, simply tuck it in. It took 6 pair to give the look I wanted. Alternate the socks for a pleasing color pattern. |

Re-twist the ends back together and you now have a wreath
form. Add a bow and any other decorations
you want. I gave the wreath to my mother
this week. She loved it and as each
sibling has come by I get the same happy reaction.
Thanks for stopping
by and happy holiday crafting to you!

Saturday
Vintage Christmas Decorations

The old tree took up way too much space and wasn't exciting. We decided to make a dramatic change. I made a trip to the limited shopping spots out here and didn't find an artificial tree worth buying. They were either too big or too sparse-cheap looking. I headed out to the storage shed and pulled out the old fake tree. The top section really had a pretty nice shape. On the way in to the house I spotted a black feed bucket and went to check it out, to my delight a galvanized bucket was inside. I cleaned it up and popped the tree top in. Yes!


White lights, a striped bow, and burlap coffee bag and we have a sweet new space saving tree.

Have you found a way to re-use old things? Please share!

Wednesday
Kitchens are where the holidays begin.
 Some of my best holiday memories involve the kitchens of my mother, and grandmothers. I love the smells that cause me to stop, close my eyes, and spend a moment remembering those days. To make sure my kids and grands will have moments like that when I'm gone, I start with giving the kitchen a look and feel that says "Nini's kitchen". Use herbs to create wreaths or add to an existing wreath for an aroma that lingers all season. You can see a photo tutorial on how to make a Rosemary wreath here. Putting out some eye candy certainly lends to the air. Use what you have, add ribbons, herbs, cookie cutters, ornaments to make magic.
  |
| Cookies...who doesn't associate them with Christmas! |
 |
| Rosemary wreaths smell wonderful. |

 |
| I love this collector piece depicting my favorite Christmas movie Miracle on 34th Street. |
 |
| Miss matched stemware and coordinating ribbon pulls the candles together. |
 |
| Balance colors across shelving. |

 |
| Rope lights above cabinets create great mood. I did it myself! |

Subscribe to:
Posts (Atom)